How to Decorate a Wall Without Hanging Frames opens the door to a world of creativity and innovation. Decorating your walls can truly transform a space, and the best part is that you don’t need to rely on traditional frames to do so. By exploring various alternative methods, you can express your personality and style while adding warmth and vibrancy to your home.
This guide will take you through an array of unique decoration ideas, from using removable wall decals and textiles to incorporating plants and clever lighting. Each method offers its own charm, allowing you to create a beautiful wall that speaks to your aesthetic without the constraints of hanging frames.


Alternative Wall Decoration Ideas
Decorating your walls can be a fun and creative process, especially when you want to avoid traditional frames. There are numerous alternative methods to enhance your space without the hassle of hanging frames. These ideas allow for personalization and can easily be changed to refresh your décor.One popular option is the use of removable wall decals. These versatile decorations can transform your wall while offering several benefits, such as ease of application and the ability to change them whenever you desire.
They come in various designs, sizes, and colors, making it easy to find something that resonates with your personal style.
Removable Wall Decals
Removable wall decals are an excellent choice for those looking to add character to their walls without permanent alterations. The process of applying them is straightforward: simply clean the wall surface, peel off the backing, and adhere the decal. No special tools are required, and they can often be repositioned or removed without damaging the wall.
- Variety of Designs: From whimsical patterns to inspirational quotes, there’s a decal for every taste.
- Easy Application: No glue or nails needed. Just peel and stick.
- Damage-Free Removal: They can be taken off cleanly, making them ideal for renters.
- Customizability: Many companies offer personalized decals to fit specific dimensions or themes.
Using Washi Tape for Designs
Washi tape offers an innovative way to create your own wall art without the need for frames. This decorative masking tape is available in countless colors and patterns, providing a canvas for your creativity. To use washi tape, start by planning your design on paper, then simply apply the tape directly to the wall in your desired pattern. The flexibility of washi tape allows for both temporary and permanent designs.
For a temporary look, you can create seasonal decorations that can be easily removed without leaving residue. Consider these aspects when using washi tape:
- Design Versatility: Create shapes, Artikels, or even entire murals by layering different tapes.
- Color Coordination: Match the tape with your room’s color scheme for a cohesive look.
- Simple Removal: Easily peel off the tape when you want to change your design.
- Low Cost: Washi tape is an affordable option for those on a budget.
“Washi tape transforms any wall into a blank canvas, inviting endless creativity.”
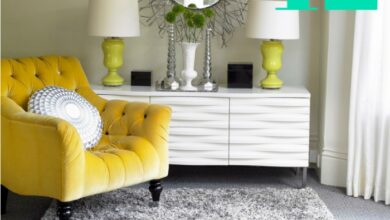
Textiles and Fabrics in Wall Decor

Source: mydailymagazine.com
Textiles and fabrics offer a unique and dynamic way to enhance wall decor, infusing warmth and personality into any space. From colorful tapestries to cozy quilts, these materials allow for versatile design choices that can dramatically alter the look and feel of a room. Utilizing textiles not only adds texture but also creates a comforting atmosphere, making your walls inviting and engaging.
Fabric Panels and Tapestries as Wall Decor
Fabric panels and tapestries can serve as stunning focal points in your home. They come in various patterns, colors, and textures, making it easy to find pieces that reflect your personal style. To create a striking display, you can hang a large tapestry that speaks to the theme of your room, such as a nature scene or abstract art. In addition, fabric panels can be framed or simply stretched over wooden frames to achieve a clean, modern look.
This approach allows you to change the fabric as your style evolves or the seasons change. Using a decorative rod or a curtain track can facilitate easy adjustments, maximizing your wall’s potential without permanent changes.
Hanging Quilts or Blankets Without Nails
Hanging quilts or blankets adds a cozy, homey feel to your space while avoiding damage to your walls. A simple yet effective method is to use fabric hangers or clips that can be easily attached to the fabric. This technique allows for a seamless presentation and can be adjusted without leaving marks.Another creative solution is to use a wooden dowel, threading it through the quilt’s top edge.
You can then secure the dowel with adhesive hooks, which provide a sturdy hold without the need for nails. This method is particularly helpful for showcasing cherished quilts or family heirlooms, making them a part of your decor while preserving their integrity.
Creating a Fabric Wall Collage
A fabric wall collage is a wonderful way to express your creativity and personal style. This technique involves arranging various fabric pieces in a cohesive design, combining different patterns and textures to create visual interest. Begin by selecting a color palette that complements your room, then gather fabrics in diverse shapes and sizes.When arranging your collage, consider layering some fabrics over others to add depth.
You can use removable adhesive strips or craft glue to attach the pieces directly to the wall, ensuring that you can reposition them until you achieve the desired look. For added dimension, incorporate fabric-covered boards or canvases that can act as bases for your collage. In summary, textiles and fabrics offer endless possibilities for wall decoration without the need for traditional frames.
By utilizing fabric panels, quilts, and collages, you create a personalized and inviting space that reflects your unique style.
Utilizing Shelving for Decoration
Shelving can transform a plain wall into a vibrant display of personality and creativity. By thoughtfully choosing and arranging shelves, you not only add functional storage but also create a stunning visual impact in your space. This guide will explore various types of shelves, how to arrange decorative items effectively, and the best materials for DIY floating shelves.
Types of Shelves for Wall Decoration
There are several types of shelves that can be utilized for decorative purposes. The right choice can enhance any room’s aesthetic.
- Floating Shelves: These shelves appear to “float” on the wall, giving a sleek and modern look. They are perfect for displaying small plants, books, and decorative objects.
- Corner Shelves: Ideal for utilizing space in corners, these shelves can add depth to a room while serving as a platform for decorative items or knick-knacks.
- Wall-Mounted Shelving Units: These units can include multiple shelves and can be arranged in various configurations, allowing for a more extensive display area.
- Ladder Shelves: Resembling a ladder, these shelves lean against the wall and provide a unique and casual approach to decoration. They can display books, plants, or decorative boxes.
Arranging Decorative Items on Shelves
Arranging items on shelves is an art that can significantly impact how your space feels. Following a few simple guidelines can help create a cohesive and inviting display.
- Vary Heights: Use items of different heights to create visual interest. Taller items, like vases, can be placed at the back, while smaller items can be in the front.
- Group Items: Arrange items in groups of three or five. Grouping creates a sense of balance and makes it easier for the eye to move across the shelf.
- Consider Color: Use color to create harmony. Arrange items that complement each other, mixing textures and materials to add depth.
- Leave Space: Avoid overcrowding. Leaving some empty space allows the eye to rest and creates a more sophisticated look.
Best Materials for DIY Floating Shelves and Installation Tips
Creating your own floating shelves can be a rewarding project. Choosing the right materials and ensuring proper installation is key to their success.
- Materials: Plywood, solid wood, and MDF (medium-density fiberboard) are excellent choices for DIY floating shelves. Solid wood provides durability, while plywood and MDF are economical and easy to work with.
- Installation Tips:
- Use a stud finder to locate wall studs for secure mounting.
- Employ brackets for added support, especially for longer shelves.
- Level the shelves before securing them to ensure a straight appearance.
- Consider using wall anchors if you are unable to mount directly into a stud.
The beauty of shelving lies not just in functionality but in the personal touch it adds to your environment.
Wall Art Without Frames
Creating wall art without the need for frames opens up a world of creativity and personal expression. It allows for flexibility in design and the opportunity to showcase unique pieces that reflect your style. Whether using canvas, wood boards, or other materials, art can transform a bare wall into a stunning focal point.One way to create art pieces is by painting directly on canvas or wood boards.
These surfaces can be found in various sizes, offering the chance to play with scale and composition. For instance, a large canvas can serve as a bold statement piece, while smaller wood boards can be arranged in a cluster for a more dynamic display. Additionally, using clips or magnets to hold artwork can simplify the process of displaying and changing out pieces.
This method not only makes it easy to swap art when the mood strikes but also adds a modern touch to your decor.
Using Paper or Fabric for Gallery Wall Effects
Creating a gallery wall effect using paper or fabric is an approachable and vibrant way to showcase art without frames. This technique can bring texture and color to your space, enhancing the overall aesthetic.To start, gather a mix of materials, such as patterned paper, fabric swatches, or even hand-painted pieces. The beauty of this method lies in the variety of designs you can incorporate.
When arranging these items on your wall, consider the following points:
- Layout Planning: Before adhering anything to the wall, lay out your designs on the floor to experiment with different arrangements. This allows for adjustments in spacing and alignment without commitment.
- Adhesive Options: Use removable adhesive strips or washi tape for an easy, non-damaging application. This makes it simple to rearrange or replace pieces as your taste evolves.
- Mixing Textures: Combine different textures and patterns to create visual interest. A mix of soft fabrics and bold graphics can create a compelling contrast.
- Balance and Harmony: Aim for balance by varying the sizes of the pieces while maintaining a cohesive color palette. This helps in achieving a unified look.
“Art is not what you see, but what you make others see.” – Edgar Degas
By using these approaches to display wall art without frames, you can curate a personal gallery that tells your unique story, elevating your living space in a meaningful way.
Incorporating Plants into Wall Decor
Adding greenery to your walls not only enhances the aesthetic appeal of your space but also promotes a sense of well-being. Incorporating plants into wall decor can create a refreshing environment that breathes life into any room. From vertical gardens to living walls, the possibilities for using plants as decorative elements are vast and inspiring.
Vertical Gardening on Walls
Vertical gardening is a creative way to utilize wall space, especially in smaller areas where traditional gardening may not be feasible. This method allows you to grow plants upward, making a statement while conserving floor space. Consider the following approaches when planning your vertical garden:
- Wall-mounted Planters: These come in various styles and can be attached directly to walls. Look for modular systems that allow for easy arrangement and reorganization of plants.
- Pocket Planters: Made from breathable fabric, these planters can be hung on walls, creating a soft, textured look. They are ideal for herbs and small flowering plants.
- Trellises with Climbing Plants: Install a trellis on your wall and allow climbing plants like ivy or jasmine to grow up it. This creates a lush, natural look that can enhance any area.
Creating a Living Wall with Succulents
Succulents are a popular choice for living walls due to their low maintenance and vibrant colors. Creating a living wall with succulents involves specific techniques to ensure their health and aesthetic appeal. Here’s how to get started:
- Selecting the Right Succulents: Choose a variety of shapes, sizes, and colors to create visual interest. Popular options include Echeveria, Sedum, and Haworthia.
- Using a Vertical Planter Frame: A modular planter frame designed for succulents allows for optimal drainage and air circulation. These frames often feature pockets or slots where plants can be inserted.
- Soil and Watering Needs: Use a well-draining soil mix specifically formulated for succulents. Water sparingly, allowing the soil to dry completely between watering sessions to prevent root rot.
Types of Wall Planters and Installation Methods
There are various types of wall planters available, each offering unique benefits and aesthetics. Understanding the installation methods can help you choose the right option for your space.
- Wall-mounted Containers: These come in ceramic, wood, or metal and can be hung using brackets or hooks. Ensure they are securely fastened to support the weight of the plants and soil.
- Vertical Garden Panels: Panels made of felt or fabric can hold multiple plants and can be easily mounted. These are lightweight and suitable for various plant types.
- DIY Options: Consider repurposing wooden crates or pallets into wall planters. Secure them to the wall using appropriate anchors for added stability.
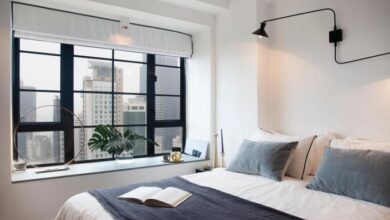
Creative Lighting Solutions
Lighting is an essential element in wall decoration that can transform the atmosphere of a room. By using creative lighting solutions, you can highlight architectural features, create focal points, and add a warm ambiance. This section explores innovative ways to enhance your walls using light, making your space more inviting and visually appealing.
String Lights and LED Strips as Wall Decorations
String lights and LED strips offer a versatile and enchanting way to decorate your walls. They can provide soft illumination and create a cozy atmosphere perfect for any setting. Here are some ways to utilize these lighting options effectively:
1. Drape and Hang
Hang string lights along the edges of a wall or drape them across shelves to create a whimsical effect. This works particularly well in bedrooms or cozy reading nooks.
2. Artikel Features
Use LED strips to Artikel architectural features such as alcoves, shelves, or picture rails, enhancing their visual appeal. This technique highlights the unique aspects of your space while providing ambient light.
3. Display Art
Incorporate string lights around art pieces or wall decals. This not only draws attention to the artwork but also adds a layer of depth and warmth.
4. Mood Setting
Opt for color-changing LED strips to adjust the mood of your space according to different occasions or times of day.
“The right lighting can turn any ordinary wall into a stunning display.”
Wall Sconces for Aesthetic Appeal
Wall sconces are an elegant solution for adding both style and function to your walls. These fixtures come in various designs, materials, and finishes, allowing you to select options that complement your decor. When choosing wall sconces, consider the following:
Style Matching
Select sconces that align with your room’s aesthetic, whether it’s modern, rustic, or classic. For instance, industrial-style sconces can add a touch of urban chic to a contemporary space.
Placement Considerations
Position sconces at eye level to create a balanced look. Consider flanking mirrors or artwork with sconces to enhance their impact.
Dimmer Switches
Install dimmable sconces to adjust brightness as needed. This allows for versatility in creating different moods, from bright task lighting to soft, ambient glow.
“Sconces not only illuminate but also serve as stunning design elements that elevate any wall.”
Using Projectors for Image or Pattern Display
Projectors are an innovative tool for transforming your walls into dynamic canvases. By projecting images or patterns, you can create stunning visual displays that change with your mood or the occasion. Here’s how to effectively use projectors:
Choosing the Right Projector
Select a projector with high resolution and brightness to ensure clear and vibrant images. Consider portable models for flexibility in adjusting display locations.
Creative Content
Use projectors to display anything from calming landscapes to intricate patterns or seasonal decorations. This flexibility allows for easy customization depending on your preferences.
Setting the Scene
Position your projector at the optimal angle to fill the wall space you want to illuminate. Experiment with different distances to achieve the desired size and focus of your projected images.
“Projecting images onto walls is a captivating way to blend art and technology, creating a unique atmosphere.”
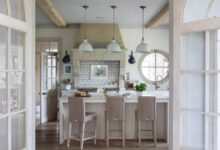
DIY Wall Decor Projects

Source: homecrux.com
Creating unique wall decor can be a fulfilling way to personalize your space while also being eco-friendly. DIY projects allow you to express your creativity and add character to your walls without spending a fortune. Here are some engaging projects you can undertake using simple materials and techniques that will transform your walls into stunning art pieces.
Making Wall Art from Recycled Materials
Utilizing recycled materials for wall art not only helps the environment but also gives your decor a story and a unique touch. Here’s a simple step-by-step guide to creating a beautiful piece from items you might already have at home:
1. Gather Materials
Collect items such as old magazines, cardboard, fabric scraps, or even bottle caps.
2. Choose a Base
Select a sturdy base like cardboard or a canvas. If you’re using cardboard, ensure it’s thick enough to support your artwork.
3. Design Your Layout
Before gluing anything down, lay out your materials on the base. Play with different arrangements until you find one that you love.
4. Adhere Your Materials
Use glue to attach your materials to the base. Make sure to apply enough glue for a strong hold.
5. Add Finishing Touches
Once dry, consider adding paint or additional embellishments for depth and texture. This could include splashes of color or layers of fabric for a 3D effect.
6. Display Your Artwork
Find a prominent place on your wall to hang your new creation, celebrating your effort and creativity.
Stenciling Designs Directly onto Walls
Stenciling is a fun and artistic way to add patterns or designs to your walls without the need for frames. This method allows for a high degree of customization and can easily fit any style. Here’s how to do it:
1. Choose Your Design
Whether it’s floral patterns, geometric shapes, or a custom quote, select a design that resonates with your style.
2. Prepare Your Wall
Ensure your wall is clean and smooth. Patch any holes and consider painting the wall a solid color to enhance the stenciled design.
3. Create or Purchase a Stencil
You can buy pre-made stencils or make your own using a craft knife and stencil material.
4. Secure the Stencil
Use painter’s tape to hold the stencil in place on the wall to prevent it from shifting while you paint.
5. Apply Paint
Using a stencil brush or sponge, apply paint carefully, ensuring you don’t overload the brush to avoid bleeding under the stencil.
6. Remove the Stencil
Carefully lift the stencil to reveal your design. Touch-up any areas as needed.
7. Seal Your Work
For longevity, consider sealing your stenciling with a clear varnish.
Creating a Photo Collage Using Clothespins or String
A photo collage is a delightful way to showcase memories and moments that matter to you. Using clothespins and string adds a whimsical touch to your display. Here’s how to create one:
1. Select Your Photos
Choose a collection of photos that represent special moments. Consider varying sizes for an eclectic look.
2. Choose Your Location
Determine the ideal wall space for your collage. A long wall or above a desk works well.
3. Prepare String
Cut lengths of string or twine to fit the width of your chosen space, allowing some slack for a droop effect.
4. Attach the String
Use nails or adhesive hooks to secure the string to the wall at both ends. Ensure it is taut to keep your photos from sagging.
5. Clip Your Photos
Use clothespins to attach your photos to the string. You can organize them in a pattern, or let them hang freely for a more casual look.
6. Personalize Your Collage
Add decorative elements such as small banners, fairy lights, or additional clips to enhance the visual appeal.
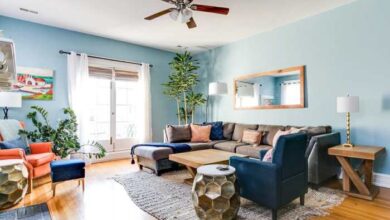
Psychological Impact of Wall Decor

Source: homecrux.com
The way we decorate our walls can significantly influence not only the aesthetics of our space but also our emotions and overall mood. Colors, textures, and patterns can evoke feelings and perceptions that create a profound connection between our environment and our mental wellbeing. Understanding these psychological impacts can help us make more informed decisions when decorating our walls, ultimately leading to a more harmonious living space.Colors and textures on walls play a crucial role in shaping our mood.
For instance, warm colors like reds and oranges are often associated with energy and passion, while cool colors like blues and greens can evoke calmness and tranquility. Textures, such as a rough finish or smooth surface, can also impact how we feel in a space. A textured wall can add depth and warmth, making a room feel inviting, while a sleek, smooth finish may create a more modern and sophisticated atmosphere.
Influence of Wall Decorations on Space Perception
The choice of wall decorations can also alter our perception of space, making a room feel larger or cozier. This aspect is crucial, especially in smaller areas where maximizing space is a priority. Here are key factors to consider regarding how wall decorations influence spatial perception:
- Light Colors: Using lighter shades on walls can make a small room appear larger and more open. This is due to the way light interacts with lighter colors, reflecting more light and creating an airy feel.
- Mirrors: Strategically placing mirrors can create the illusion of depth and openness. They reflect light and views, making spaces feel more expansive than they truly are.
- Vertical Lines: Incorporating vertical patterns or decorations can draw the eye upward, giving the illusion of higher ceilings and a more spacious feel.
- Minimal Decorations: A minimalist approach often emphasizes openness and simplicity, which can create a sense of calm and spaciousness.
- Eclectic Decorations: An eclectic style, filled with various pieces and textures, can add warmth and personality but may also make a space feel busier and more confined if not balanced properly.
“The way we perceive our space is not merely about its dimensions, but the emotional resonance created by our decor choices.”
Comparison of Minimalist and Eclectic Styles
Minimalist and eclectic wall decoration styles each come with their own psychological implications. A minimalist style is characterized by simplicity and functionality, often featuring a limited color palette and fewer decorative elements. This approach can lead to a serene and uncluttered environment, promoting focus and reducing stress. On the other hand, an eclectic style embraces a mix of colors, patterns, and decor from various influences.
While this can create a vibrant and lively atmosphere, it can also lead to sensory overload if not curated thoughtfully. Here are distinct elements of both styles:
- Minimalist Style:
- Utilizes a monochromatic or neutral color scheme.
- Emphasizes negative space for a sense of calm.
- Fewer decorative items, which reduces distraction.
- Eclectic Style:
- Combines various colors, patterns, and textures.
- Showcases personal collections and unique finds.
- Creates a lively and dynamic atmosphere, inviting conversation.
In summary, the psychological impact of wall decor extends far beyond mere aesthetics. By carefully considering colors, textures, and styles, we can curate spaces that not only reflect our personal tastes but also enhance our emotional well-being and perception of our environment.
Final Thoughts
In conclusion, How to Decorate a Wall Without Hanging Frames presents myriad possibilities for making your walls come alive. Embracing these creative techniques not only enhances your living space but also reflects your personal touch. So gather your materials, unleash your creativity, and transform your walls into an inspiring canvas that tells your story.
FAQs
What are some budget-friendly wall decoration ideas?
Consider using DIY projects such as stenciling or creating art from recycled materials. You can also use fabric remnants or wallpaper scraps for creative designs.
Can I easily remove wall decals?
Yes, most removable wall decals are designed for easy removal without damaging the paint underneath, making them a versatile choice for decorating.
How do I ensure my fabric wall decor stays in place?
Using fabric adhesive or Velcro strips can help secure fabric panels or tapestries to the wall without the need for nails or screws.
What types of plants are best for wall planters?
Succulents, trailing vines, and small ferns are great choices for wall planters, as they thrive in smaller spaces and add life to your decor.
How can I create a gallery effect without frames?
Utilize clips, magnets, or washi tape to display your artwork or photographs directly on the wall, creating a lively, informal gallery look.
Are there any special considerations for using LED lights as decor?
Make sure to choose lights that have a low heat output and are suitable for indoor use. Plan the layout beforehand for the best visual effect.